
Advanced Features
Inventory Label Printing
Core Plan Ultimate PlanCloudBridal offers advanced label printing capabilities for your inventory items, including customizable layouts and QR code generation for quick scanning. This guide covers both printing labels and using the barcode scanning features.
Contents
- Label Printing Requirements
- Setting Up Your DYMO Printer
- Printing Labels in CloudBridal
- Enhanced Label Features
- The Label Printing Screen
- Barcode Scanning Features
- Configuration Settings
Label Printing Requirements
- A Dymo LabelWriter Label Printer (550 series recommended)
- The latest DYMO Connect software installed on your computer. See DYMO user guide.
- DYMO Labels (SKU 30252, 30320, 30323, 30330, or 30334)
Setting Up Your DYMO Printer
- IMPORTANT: Install the DYMO Connect software before plugging in your printer for the first time.
- After installing the software, connect your DYMO printer to your computer and power outlet.
- Load your DYMO labels into the printer according to the instructions provided.
- Print a test label using the DYMO Connect software to ensure everything is set up correctly.
Printing Labels in CloudBridal
You can print labels in two ways:
- Individual Item Labels: From an inventory item's detail page, click the Print Label button at the top.
- Batch Label Printing: From the inventory list, click the Print Labels button, select multiple items, then click Begin Print.
Both methods will open the label printing configuration screen:
Enhanced Label Features
QR Code Labels
Ultimate PlanUltimate plan subscribers can generate labels with scannable QR codes:
- QR codes are enabled by default in the label settings
- These codes link directly to the inventory item in CloudBridal
- When scanned, they instantly pull up the item details
Customizable Label Layout
Recent updates allow for greater label customization:
- Repositionable Elements: Drag and resize label elements like item name, vendor name, price, etc.
- Custom Text: Add custom text on a per-label basis for special details
- Layout Memory: Save your position settings so the system remembers your preferred layout
- Silhouette Display: Include the item's silhouette information on the label
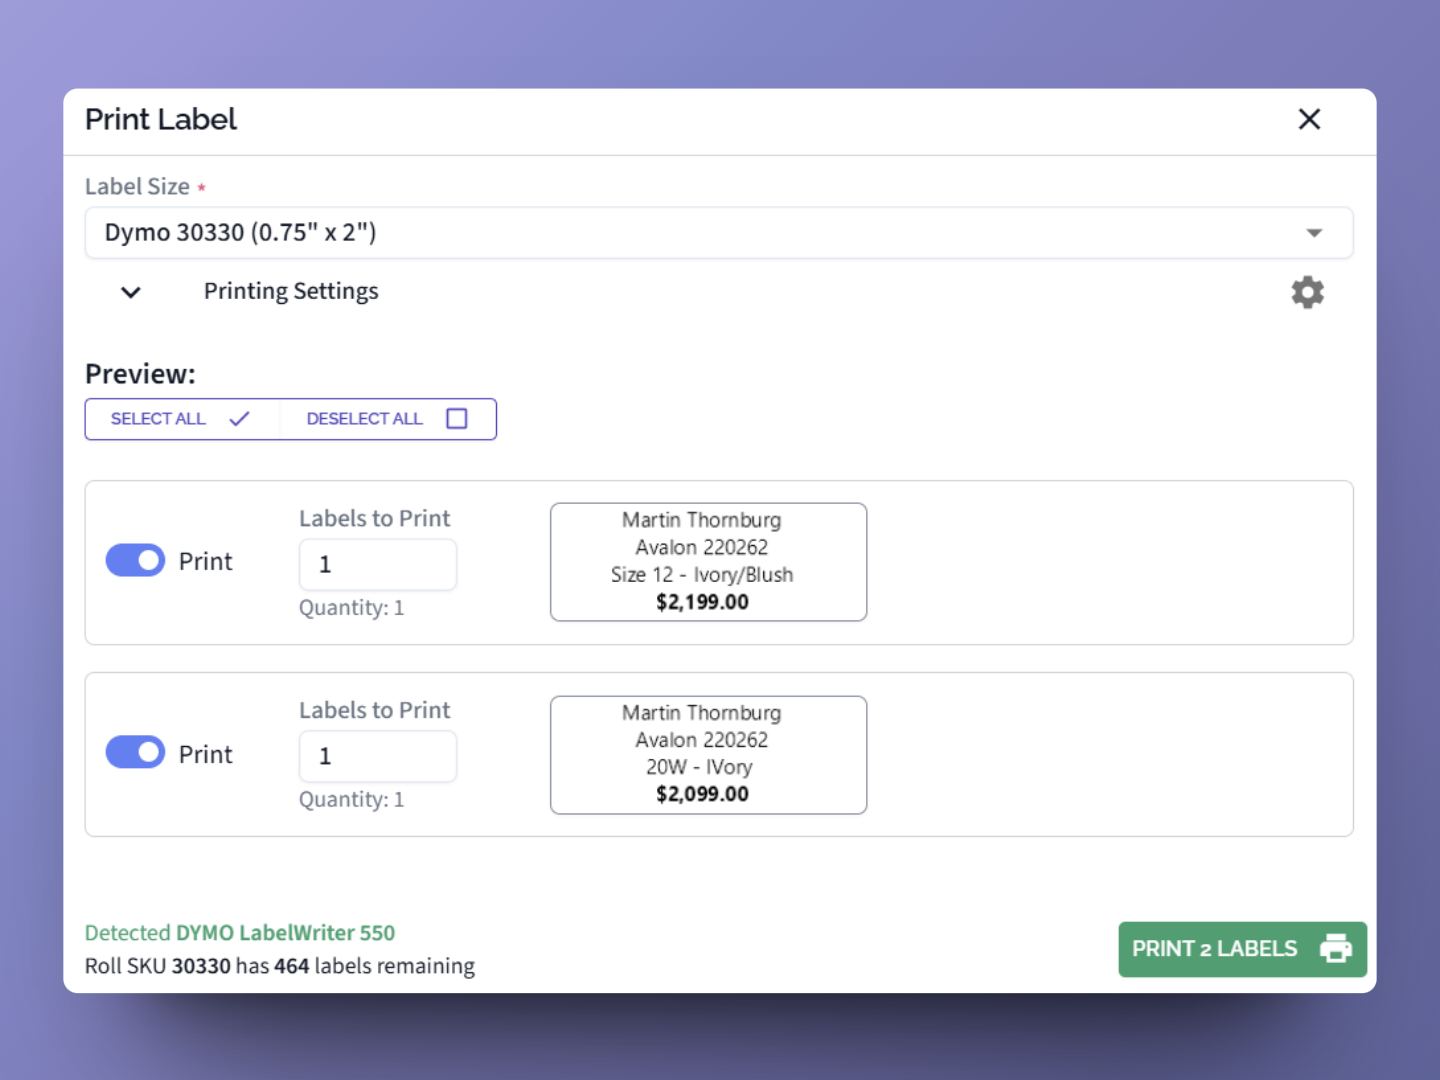
The Label Printing Screen
When printing labels, you'll see each variant of the selected item:
- Quantity: Adjust how many labels to print for each variant
- Toggle Variants: Turn specific variants on/off to include/exclude them
- Label Size: Select the DYMO label SKU you're using (auto-detected on 550 series printers)
- Content Settings: Choose which item details to display (price, item type, etc.)
- Layout: Drag elements to customize their position and size
- Custom Text: Add special notes or details to individual labels
Click the Print button when your configuration is complete.
Barcode Scanning Features
Ultimate PlanWith labels that include QR codes, you can use CloudBridal's scanning features:
Mobile Scanning Toolbar
On phones and tablets with cameras:
- A scan button appears in the bottom toolbar of CloudBridal
- Tap this button to activate your camera for scanning
- Scan any inventory item label to instantly view its details
Quick Order Creation
When viewing a customer profile:
- Scan an inventory item barcode to quickly add it to a new order
- This speeds up the sales process by eliminating manual item searches
Receiving Purchase Orders
When receiving items from a purchase order:
- The print dialog shows only the received items
- Print labels for newly received inventory items
Configuration Settings
Customize your default label settings in the Inventory Item Settings page:
- Default Label Size: Set your preferred DYMO label type
- Default Content: Choose which fields appear on labels by default
- QR Code Settings: Enable/disable QR codes (Ultimate plans only)
- Include Silhouette: Show the item's silhouette on labels
These settings apply to all labels unless overridden during printing.